Ganondorf – The Legend of Zelda: Ocarina of Time

Here he is!!! I am ridiculously excited about this doll. I started designing him with some trepidation because I felt that he needed to be a little bigger than the others and because he was so detailed. The reason this one has taken me soooooo much time to put out is that he required an extensive redesign. I like the larger doll so much that I am tempted to go back and remake some of the others. He is about 10″ tall where by other dolls are 6″ tall. My husband thinks I went overboard with the details, but I think he looks great.

The yarns used here were a variety of different brands which changes the proportions a little bit. All of them call themselves worsted weight, but the brownish green that looks so phenomenal for his skin was from a fancy knitting store and the weight was so low when I unwound it from its tight skein that I ended up doubling it up (crocheting with two strands at once) to get the look I have here. It worked nicely when I went to make the eyelids at least. The black was a Caron soft, the orange is from an Ilauke mini-skein, and the wonderful coppery brown is a Vanna White color.

Ganondorf Complete

Ganondorf (The Legend of Zelda: Ocarina of Time)

Materials

Worsted weight yarn in black, dark brown, medium brown, green, orange, gold (optional), tan, and cream.

One pair 8mm yellow or brown safety eyes

Silver, red, and gold puffy paint

3.5 mm E crochet hook

pale peach and blue embroidery floss (optional)


Legs (make 2)

Rnd 1: With dark brown yarn, ch 5, inc in second ch from hook, sc 2, sc 4 in last ch then continue around stitching into backside of ch, sc 2, inc in last ch (12)

Rnd 2: in BLO, sc 5, inc 2, sc 5 (14)

Rnd 3: sc 2, change to medium brown, sc 11, change to dark brown, sc 2 (15)

      Change to medium brown

Rnd 4: inc, sc 6, inv dec, sc 6, inc (16)

      Change to cream

Rnd 6: in BLO, sc 5, skip 7, sc 5 to create the toe of the boot. (10)

Rnd 7 – 9: sc around (10)

      Change to black

Rnd 10: 3 dc bobble, hdc, 3 dc bobble, hdc, sc, change to white, inc, change to black, hdc, 3 dc bobble, hdc, 3 dc bobble (11)

       Change to tan

Rnd 11: sc, inv dec, sc, change to black, hdc, 3 dc bobble, hdc, change to tan, inv dec, sc 3 (9)

      Change to medium brown

Rnd 12: [sc 2, inc] 3 times (12)

Rnd 13: sc around (12)

       Change to dark brown

Rnd 14: [sc 5, inc] 2 times (14)

Rnd 15: sc around (14)

Rnd 16: in BLO, [sc 5, inv dec] 2 times (12)

Rnd 17: sc around (12)

       sl st in next st and FO

      stuff the legs and boots.

Attach medium brown yarn to the first open brown loop on the boot. Sc 2, inv dec 2, sc 2, FO leaving a long tail and use to sew the top of the boot closed by stitching the outside loops of the sc together to create a smooth top.

Body and Head

Rnd 1: With dark brown yarn join the legs and sc around (22)

Rnd 2: change to medium brown, sc 3, change to dark brown, sc 5, change to medium brown, sc 6, change to dark brown sc 5, change to medium brown, sc 3 (22)

Rnd 3: FP tc, FP dc, sc 2, change to dark brown, sc 3, change to medium brown, sc 2, FP dc, FP tc 2, FP dc, sc 2, change to dark brown, sc 3, change to medium brown, sc 2, FP dc, FP tc (22). The front post stitches are intended to make the crotch/butt armor. The central FP tc stitches should almost connect between the legs where the FP dc stitches will only go down one row.

Rnd 4: Change to black yarn, sc 9, change to cream, sc 5, change to black, sc 9 (22)

Rnd 5: Change to medium brown, sc 9, in BLO, sc 5, in both loops, sc 9 (22)

Rnd 6 – 8: sc around (22)

Rnd 9: sc 5, change to black, sc 3, change to medium brown, sc 8, change to black, sc 3, change to medium brown, sc 4 (22)

Rnd 10: inc, sc 4, change to black, sc 3, inc, change to medium brown, sc 8, change to black, inc, sc 3, change to medium brown, inc, sc 3 (26)

Rnd 11: sc 4, change to black, sc 6, change to medium brown, sc 6, change to black, sc 6, change to medium brown, sc 4 (26)

Rnd 12: inv dec, sc, change to black, inv dec, sc 5, inv dec, sc 2, inv dec, sc 2, inv dec, sc 5, inv dec, sc, inv dec, sc (24)

Rnd 13: [inv dec, sc] 8 times (16)

       Stuff the body

Rnd 14: [sc, inv dec] 4 times (8)

       Change to skin color

Rnd 15 – 16: sc around (8)

Rnd 17: inc around (16)

Rnd 18: [sc 2, inc] 2 times, sc, hdc, dc, 2 dc bobble, dc, hdc, sc, [sc 2, inc] 2 times (20)

Rnd 19: sc 10, [ch 3, sl st in second ch from hook, sc in last ch, sc in side of sc your ch is off of] nose made, returning to stitching in the round, sc 10 (20, not counting nose)

Rnd 20: sc 5, [ch 3, insert hook into next row down and out again around the post of that stitch (just like you would do for an FP dc), draw up a loop, turn and sc into your ch. Sc into the outside loop of the next two ch, your next stitches are back on the round of the head] ear made, sc 5, skip the nose and sc into the next regular sc on the head round, sc 3, repeat ear, sc 3 (20, not counting nose)

Rnd 21: sc around, stitching into sc stitches around the ear as if the ear wasn’t there (20)

Rnd 22: sc 6, inv dec, sc 3, inv dec, sc 7 (18)

Rnd 23: sc around (18)

       Attach safety eyes between rounds 15 and 16.

      Stuff the head

Rnd 24: [inv dec, sc] 6 times (12)

Rnd 25: invdec 6 (6)

      FO and close the hole

Right Arm

Rnd 1: with skin color, make a magic ring and sc. ch 2, sl st into second ch from hook, sc into ring (thumb), [ch 4, sl st 2, sc into ring] 3 times (three fingers), ch 3, sl st 2 (pinky finger), sc 3 into ring (8 sc with five fingers sticking out of ring)

Rnd 2: sc around, skipping fingers (8)

Rnd 3: hdc 3, 2 hdc in next st, change to black, 2 dc tog, dc, 2 dc tog, change to skin tone, hdc, sc in next st (8)

      Change to cream

Rnd 4 – 7: sc around (8)

      Change to black

Rnd 8: in BLO, [inc, sc 3] 2 times (10)

Rnd 9 -12: sc around (10)

      Lightly stuff the arm

Rnd 13: inv dec around (5)

      FO and close the hole, leaving a long yarn end for sewing

Left Arm

Rnd 1: with skin color, make a magic ring and sc. ch 3, sl st into second ch from hook, sl st into next ch, sc into ring (pinky finger), [ch 4, sl st 2, sc into ring] 3 times (three fingers), ch 2, sl st (thumb), sc 3 into ring (8 sc with five fingers sticking out of ring)

Rnd 2: sc around, skipping fingers (8)

Rnd 3: hdc 3, 2 hdc in next st, change to black, 2 dc tog, dc, 2 dc tog, change to skin tone, hdc, sc in next st (8)

       Change to cream

Rnd 4 – 7: sc around (8)

      Change to black

Rnd 8: in BLO, [inc, sc 3] 2 times (10)

Rnd 9 -12: sc around (10)

       Lightly stuff the arm

Rnd 13: inv dec around (5)

       FO and close the hole, leaving a long yarn end for sewing

      Sew arms to body

Ganondorf - Arms attachment

Armor

With black, ch 21

Row 1: starting in second ch from hook, sc 20, turn

Row 2: ch 1, sc 5, hdc 3, dc 4, hdc 3, sc, 5, turn

Row 3: sl st, sc 2, 2 hdc in next st, 3 dc in next st, 2 hdc in next st, sc, inc, 2 hdc in next st, 3 dc in next st, 2 hdc in next st, inc, sc, 2 hdc in next st, 3 dc in next st, 2 hdc in next st, inv dec, sc, sl st, turn

Row 4: sl st, sc 3, hdc, 2 hdc in next st, 3 dc in next st, 2 hdc in next st, hdc, sc 15, hdc, 2 hdc in next st, 3 dc in next st, 2 hdc in next st, hdc, sc 2, sl st, FO


Armor Collar

Attach black to back loop of starting ch, 3 st in from the end

Row 1: [sc 3, inv dec] 3 times, sc 2, turn (10)

Row 2: in FLO, sc around (10)

Row 3 – 4: sc around (10)

      FO, leaving a long end for sewing

      Sew around shoulders

Cape

With red, ch 24, leaving a long end at the beginning of the ch for sewing

Row 1: sc 23

Row 2: sl st 3, sc 3, hdc 11, sc 3, sl st 2

Row 3: sl st 3, [sc 3, inc] 4 times, sl st 2

Row 4: sl st 3, sc 3, [2 hdc in next st, hdc 3] 3 times, sc 2, sl st, turn

Row 5: sl st, [sc 3, inc] 3 times, sl st 2

Row 6: sl st, inc, sc 8, inc, turn

Row 7 – 8: ch 1, sc 12, turn

Increase Row: ch 1, inc, sc across, turn

Length Row: ch 1, sc across, turn

      Repeat increase row once and then length row 2 times, until cape has the desired length

      May make the bottom row with gold yarn or add a fringe if desired.

      Sew the cape to the front of the shoulders

Attach cream colored yarn to the end of the cape over the left shoulder and ch 6.

Loop through the end of the cape over the right shoulder and sl st back into ch,

Row 1a: sl st, sc, hdc 2, sc, sl st, turn (6)

Row 2a: sc, hdc, dc, hdc, sc, sl st (6)

Belt

Attach cream yarn to free loops at doll’s waist, starting from the left side with the doll upside down.

Row 1: sc across (5)

Row 2: sl st, sc, hdc, sc, sl st

        FO, weave in ends.


Hair

Using orange yarn, cover the head in turkey work (make a stitch with a loose loop and then stitch into same st with a tight stitch to anchor the loop. Make sure to make bushy eyebrows angled down towards his nose to make him look evil/angry. Leave him with a receding hairline so you have space for his forehead decoration. Cut open the loops and trim the hair and eyebrows to the desired length.

Note that the bottom right image below shows Ganon with side burns as well as eyebrows. While this matches the images of him, I didn’t like the way it turned out. In these images, Ganon has longer hair and I have not yet cut open the loops. The eyebrows look a bit odd with the loops intact, but the hair looks good cut or looped. I actually made two dolls so I could get all the pictures I wanted of this very complicated doll. The doll shown in the completed pictures had shorter hair (smaller loops) even before I cut the loops open to make his hair shaggy. Again, I like it either way so I included both sets of pictures.

Eyelids

With skin tone green yarn, run two stitches from the top outside corner of the eye to the middle inside of the eye, leaving the yarn overlapping the top part of the safety eye. For the lower lid, start from the same point on the nose side of the eye as the upper lid, angle down to about a third of the way across the bottom of the eye, catch the needle through the yarn of the face there, and then finish the lower lid by making a line parallel to and just shorter than the upper lid.


Finishing

The head decoration and necklace are made with puffy fabric paint. I made the silver shape first and then added a red circle for each gem. I filled the circle in with gold paint and let the doll dry for 24 hours. You can do this step before or after the embroidery on the cream colored areas.

The embroidery on the cream colored areas is optional. My husband didn’t think it needed it, but I couldn’t resist the detail. I tried using yarn, but the colors were inappropriately bright and the lines were too thick. Six stranded embroidery floss worked out better. There is a peach rectangle on the side of each limb and then the blue goes all the way around each limb with a line above each peach rectangle and a square U in-between them. On the cape connector and belt, there is a square wave pattern with each color, leaving space for a star in the middle.

You may also choose to embroider gold designs on the cape.

Here are the completed images of my best, largest, most detailed doll to date!
Zelda – The Legend of Zelda: Ocarina of Time

I wrote a pattern for the Zelda from the first game, but somehow I just haven’t gotten around to making her yet. I definitely need to try my pattern because there are inevitably things that don’t work quite right and I tweak the pattern. I’m working on Impa from this same game right now and my first “draft” of her and Sheik REALLY did not go well. Usually I try a few rows and then pull it out and change it if I wasn’t happy with it, but if I get too far along like I did with Sheik and Impa and I’ve already put in the safety eyes, then I just finish it and experiment a bit more. On my first draft of Sheik I tried puffy paint versus stitching the silver accents with yarn (each on half the body) and decided that I liked the yarn better, but I still used paint for the design on her chest because I just don’t think my poor embroidery skills are up to that.

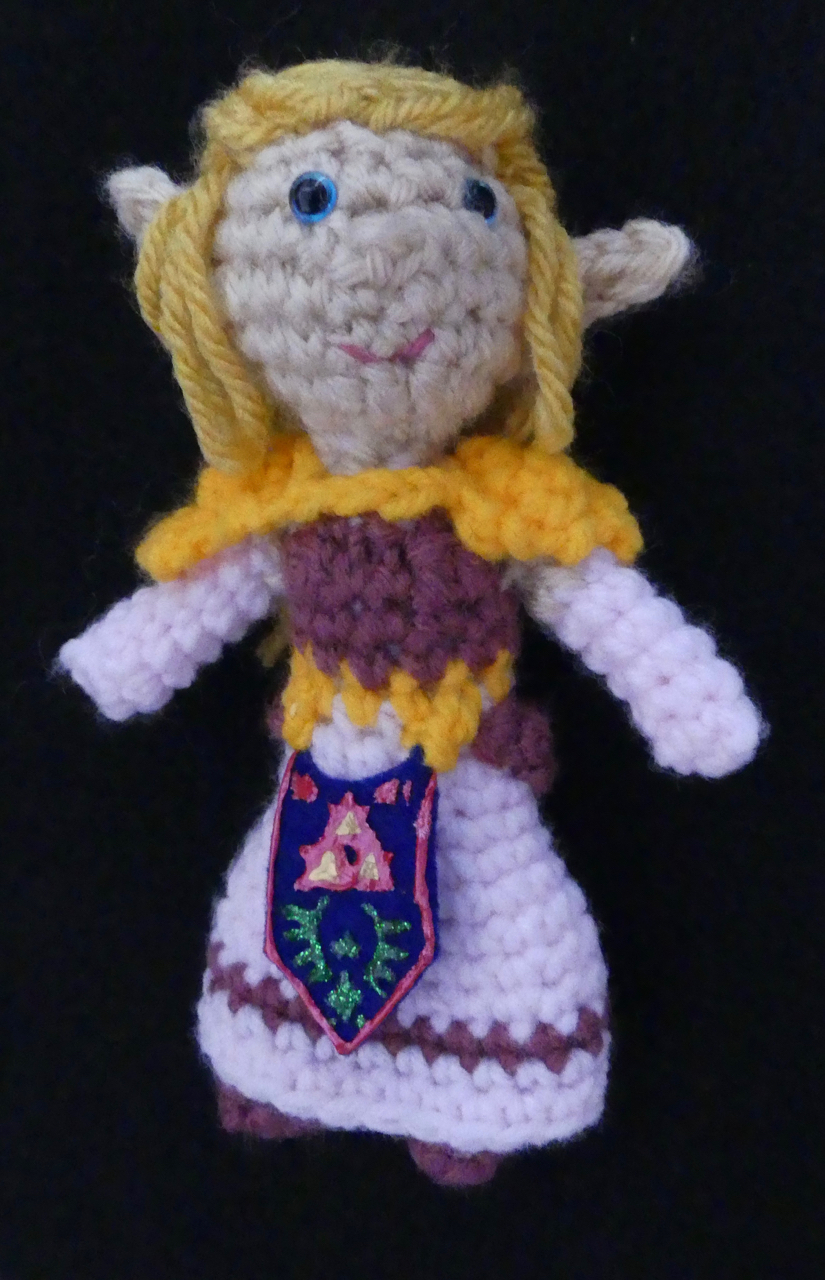
Here is the adult Princess Zelda from The Legend of Zelda: The Ocarina of Time. This game seems to have had more love in general from my friends and family so I decided to make a number of the characters. Zelda is my first one from this game and she will be followed shortly by Sheik (already done), Impa (two thirds done), Link, and my first attempt at Ganondorf. I haven’t decided if I’m going to do Rauru or Kaepora Gaebora yet. If anyone is actually reading this blog and wants to request a character, please do send me a request, but for now keep it to Ocarina of Time or earlier. I have plans to get to Breath of the Wild for sure and I want to attempt Wind Waker even though I haven’t yet figured out how I will get the cartoony appearance to work with the dolls.

As I am composing the post here, I notice that I improved the appearance of the face by moving the nose (and therefore the eyes) down a row and changing the nose a little bit. I will change the pattern below to reflect the better appearance you will see in Sheik and Impa and even my Link from A Link to the Past, but I will put the original pattern for the head below. If you like the arrangement of Zelda’s features in the pictures below, please look for the alternate instructions at the end for the head. Also note that my doll is looking over to her left a bit. You can adjust your doll to have the head pointed wherever you you like- just put the middle of the chin in the direction you want the head to point and then center the ears, nose and eyes according to that.

Without further ado, here is my first pattern for the games’ namesake.

Zelda (The Legend of Zelda: Ocarina of Time)

Zelda complete

Worsted weight yarn colors needed: dark pink for top and stripe in dress, dress itself should be very pale pink or very pink lavender. Also need skin tone, gold, light brown

Safety eyes

Polyfill

Blue felt for apron

Red, gold, and green puffy fabric paint or embroidery floss

Glue or embroidery floss to attach apron


Legs (make 2)

Rnd 1: With dark pink, make a magic ring and sc 6 (6)

Rnd 2: sc around (6)

Rnd 3: sc 4, 2 dc bobble 2 (6)

Change to skin color

Rnd 4 – 9: sc in each st (6)

sl st in next st and FO

Lightly stuff the legs.

Body and Head

Rnd 1: With light pink,  join the legs and sc around (12)

Rnd 2: sc 2, hdc 2, sc, sl st 2, sc, hdc 2, sc 2 (12)

Rnd 3: in BLO, sc 5, in both loops, hdc 2, in BLO, sc 5 (12)

Change to gold

Rnd 4: in BLO, sc around (12)

Change to dark pink

Rnd 5-6: sc around (12)

Rnd 8: sc 4, 2 dc bobble, sc 2, 2 dc bobble, sc 4 (12)

Rnd 9: sc 2, change to light pink, sc 2, change to dark pink, sc 2, inv dec, sc 2, change to light pink, inc, change to dark pink, sc 2  (12)

Stuff the body

Change to light pink

Rnd 8: invdec 3, change to skin color, invdec, change to light pink, invdec 2 (6)

Change to skin color

Rnd 9: sc around (6)

(Note: Alternate pattern for the doll shown here in the pictures as opposed to the arrangement of features of face as in Link from A Link to the Past and Impa and Sheik from Ocarina of Time is below the end of the pattern. Go to that section now to make the doll’s head exactly as seen in these pictures)

Rnd 10: inc 6 (12)

Rnd 11: [sc, inc] 2 times, sc, [sc, hdc] in next st, dc, [hdc, sc] in next st, [sc, inc] 2 times (18)

Rnd 12: sc 4, [ch 5, working in back loop of ch, sl st in second chain from hook, sc 2, hdc, dc, next sc in Rnd] ear made, sc 5, [ch 2, sl st, sc  in back loop of sc] nose made, sc 4, repeat ear, sc 4 (18, not including nose and ears)

Rnd 13: sc 4, invdec over ear, catching the rear most and front most st, sc 2, inc, sc, skip nose and sc on the other side of it, inc, sc 3, invdec over ear catching the front and rear st of ear, sc 3 (18)

Rnd 14: sc 4, insert your hook into the loop from side/back of ear to make it stand up, then put your hook into the next sc in round, draw up a loop, pull this loop through the first two loops on the hook, YO, and pull through both loops on hook to complete the sc, sc 10, insert your hook into the loop from side/back of ear to make it stand up, then put your hook into the next sc in round, draw up a loop, pull this loop through the first two loops on the hook, YO, and pull through both loops on hook to complete the sc, sc 3 (18)

Rnd 15 – 16: sc around (18)

Rnd 17: [invdec, sc] 6 times (12)

Attach safety eyes between rounds 14 and 15 on either side of the nose.

Stuff the head

Rnd 18: invdec around (6)

FO, weave in the end


Skirt

Turn the doll upside down.

Join light pink yarn to the free loop above the front middle of the doll’s left leg that is lower on the torso (the upper loop will be for the shirt bottom).

Rnd 1: sc 5, 3 sc in next loop, sc 4, in higher loops in the middle of the bottom of the belt, 3 dc (15)

Rnd 2: sc around (15)

Rnd 3: [inc, sc 4] 3 times (18)

Rnd 4: sc around (18)

Rnd 5: [inc, sc 4] 3 times, sc 3 (21)

Rnd 6: sc around (21)

Rnd 7: [inc, sc 6] 3 times (24)

Rnd 8: sc around (24). You can adjust the length of the dress to suit your style and doll by doing more or fewer of this round.

Rnd 9: sc 10, change to dark pink, sc 14 (24)

Rnd 10: sc 10, change to light pink, sc 14 (24)

Rnd 11: sc around (24)

Rnd 12: sc 11, sl st 5 (16) partial round.

FO, weave in ends.

Shirt Bottom

Turn the doll upside down.

Join dark pink yarn to the free loop just below the belt, above the front middle of the doll’s left leg.

Row 1: sc 4, inc 2, sc 4, sl st in same st, turn. You now have an unfinished round which counts as the first row. (12)

Row 2: ch 1, sl st, sc 10, sl st, turn (12)

Row 3: ch 1, sl st, inc, sc 5, inc, sl st 2 (12)

FO, weave in ends.

Arms (make 2)

With pale pink, make a magic ring, sc 6

Rnd 1-6: sc around (6)

Rnd 7: change to skin color, sc around (6)

Rnd 8: sc around (6)

FO, leaving a long end for sewing.

Stitch arms to body.


Shoulder guards (make 2)

With gold yarn, ch 10. Leave a long tail at the beginning of the chain for sewing.

Row 1: Sl st, sc, hdc, dc, sc, sl st (6)

Row 2: Sl st, sc, hdc, sc, sl st (6)

Row 3: in BLO, sc, hdc, sc (3)

Row 4: ch 1, sc, hdc, sc (3)

Row 5: ch 1, sc in middle st of row, sl st, FO (2)

The unworked ch from each of the two pieces will link into the side of the shoulder guard that lacks chain stitches. Thus the chain from one shoulder guard will go across the back of the doll’s neck and the chain from the other shoulder guard will go across the front of the neck. Use the long end of the yarn to stitch the chain from one shoulder guard into the other shoulder guard and then to stitch the shoulder guard to the doll. The unworked ch stitches can remain loose or be stitched down.

Hair

Wrap dark yellow or gold yarn around a 3” piece of cardboard about 18 times. Stitch up the middle to make a wig. If you want your doll to have a smooth, polished look, then carefully iron the wig (low temp to avoid melting the acrylic yarn) so the hair is straight (not shown here). Position the wig on the doll’s head with the stitch seam creating a centered part. Arrange the hair so there is about three strands in front of each ear. Arrange the back half of the hair evenly behind the ears. You can stitch or glue the wig on (I’d recommend doing both). Even out the back hair to go about half way down the doll’s back. The forelocks (bit of hair in front of the ears) should be about shoulder length. The front should be gathered into a half ponytail in the back of the head.

Apron

Cut apron shape out of dark blue or purple felt. I drew the design with fine tip puff paint because I hate sewing, but if you want to embroider the design or leave it blank, go ahead and make it yours. I attached the apron with yellow embroidery floss, using a two ch bit of gold yarn to cover the attach points.


Alternate Head Design (shown in images here)

Complete the legs and torso as above

Rnd 10: inc 6 (12)

Rnd 11: [sc, inc] 2 times, [sc, hdc] in next st, dc (this is the point of the chin and should be centered), [hdc, sc] in next st, [sc, inc] 2 times (18)

Rnd 12: sc 4, [ch 5, working in back loop of ch, sl st in second chain from hook, sc 2, hdc, dc, next sc in Rnd] ear made, sc 10, ear, sc 4 (18)

Rnd 13: sc 4, invdec over ear, catching the rear most and front most st, sc 4, [ch 3, sl st in second chain from hook, next sc in Rnd] to make a nose, sc 4, invdec over ear catching the front and rear st of ear, sc 3 (16 st not including nose)

Rnd 14: sc 4, insert your hook into the loop from side/back of ear to make it stand up, then put your hook into the next sc in round, draw up a loop, pull this loop through the first two loops on the hook, YO, and pull through both loops on hook to complete the sc, sc 4, skip nose and sc on the other side of it, sc 4, insert your hook into the loop from side/back of ear to make it stand up, then put your hook into the next sc in round, draw up a loop, pull this loop through the first two loops on the hook, YO, and pull through both loops on hook to complete the sc, sc 3 (17)

Rnd 15: sc around (17)

Rnd 16: [invdec, sc] 5 times, sc (12)

Rnd 17: [invdec, sc] 4 times (8)

Attach safety eyes between rounds 14 and 15.

Stuff the head

Rnd 18: invdec to close the hole (4)

Link: The Legend of Zelda – Detailed

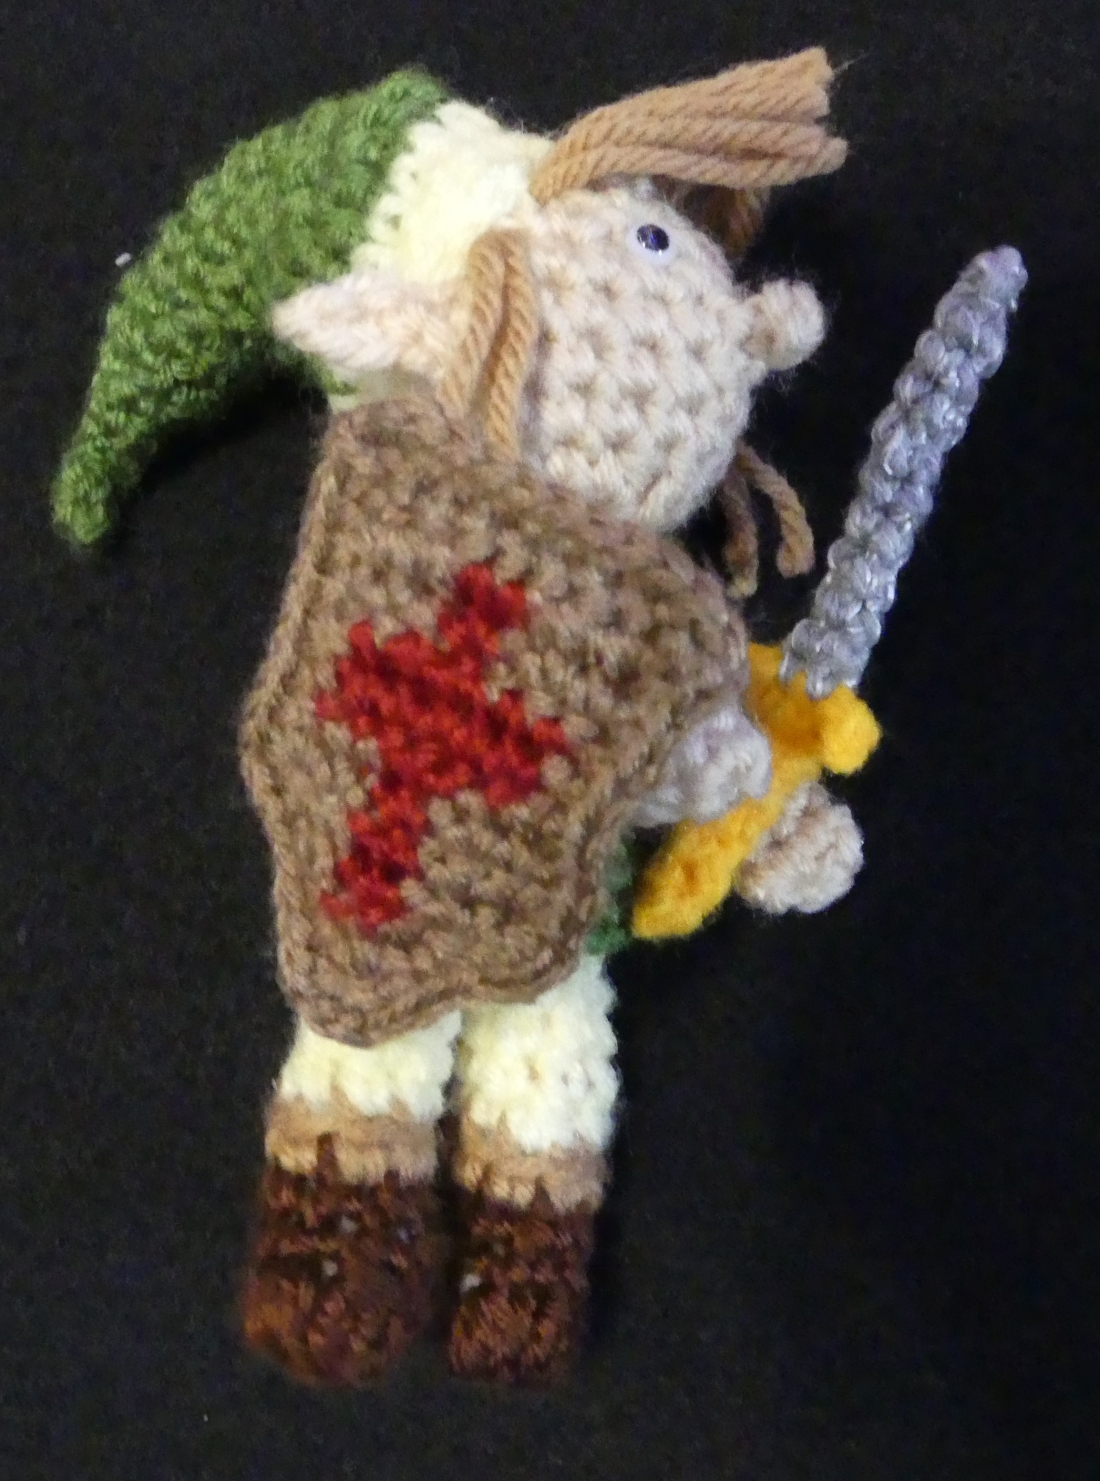
I made a number of Legend of Zelda dolls recently, improving them as I went. The doll in my previous post vanished! I had him in my purse and then he was gone. I also had only taken pictures of him with my phone. I left the post intact because his hat and nose were a little different. The revamped pattern here has a lot more pictures with it and I also created a design for the sword and shield.

One thing I did notice AFTER I had made the second doll and took all the nicer pictures though- Link isn’t wearing any pants! The picture I based my pattern on (see below) shows the legs as yellow. When I looked up the game in my Legend of Zelda Art and Artifact book, Link clearly has bare legs. Ah well. Make him how you see fit.

Enjoy!

Link from The Legend of Zelda
Completed doll with Sword and shield, side view

Link (Original appearance, The Legend of Zelda)

Materials

Dark brown, medium brown, yellow, skin tone, silver, gold, red, and yellow worsted weight yarn.

3.5 mm E crochet hook (use unless otherwise noted) and 2.5 mm C crochet hook (only where noted)

Safety eyes

Tapestry needle for sewing

Supplies to give structure to sword and shield if desired ie. cardboard and straightened paper clip


Legs (make 2)

Rnd 1: With dark brown, make a magic ring and sc 8 (8)

Rnd 2: in BLO, sc 3, 3 dc bobble st 2, sc 3 (8)

Rnd 3 – 4: sc in each st (8)

Rnd 5: Change to medium brown, sc around, attach to first st of round with sl st and FO (8)

       Change to yellow (note that my doll has yellow leggings on, but skin tone would actually be more accurate here)

Rnd 6: in BLO, sc 3, inv dec, sc 4 (7)

Rnds 7 -9: sc in each st (7)

      sl st in next st and FO

      Lightly stuff the legs.


Body and Head

Rnd 1: With yellow (or skin tone for accuracy or green to hide the goods),  join the legs and sc 5, sc tog, sc 5, sc tog (12)

Rnd 2: [sc 5, inc] 2 times (14)

Rnd 3: Change to green, sc around (14)

      Change to dark brown

Rnd 4: in BLO, sc around (14)

      Change to green

Rnd 5 – 6: sc around (14)

Rnd 7: invdec, sc 5, change to medium brown, sc 2, change to green, invdec, sc 5 (12)

      Stuff the body

Rnd 8: invdec 3, change to brown, sc 2, change to green, invdec 2 (6)

      Change to skin color

Rnd 9: sc around (6)

Rnd10: inc 6 (12)

Rnd 11: [sc, inc] 2 times, [sc, hdc] in next st, dc, [hdc, sc] in next st, [sc, inc] 2 times (18)

Rnd 12: sc 4, [ch 5, working in back loop of ch, sl st in second chain from hook, sc 2, hdc, dc, next sc in Rnd] ear made, sc 10, ear, sc 4 (18)s

Rnd 13: sc 4, invdec over ear, catching the rear most and front most st, sc 4, [ch 3, sl st, sc 2 in back loops of ch and sc] nose made, sc 4, invdec over ear catching the front and rear st of ear, sc 3 (16 st not including nose)

[If you have issues figuring out the ears there are many pictures of how to execute these properly in the pattern for Zelda – The Legend of Zelda: Ocarina of Time detailed photos post.]

Rnd 14: sc 4, insert your hook into the loop from side/back of ear to make it stand up, then put your hook into the next sc in round, draw up a loop, pull this loop through the first two loops on the hook, YO, and pull through both loops on hook to complete the sc, sc 5, skip nose and sc on the other side of it, sc 4, insert your hook into the loop from side/back of ear to make it stand up, then put your hook into the next sc in round, draw up a loop, pull this loop through the first two loops on the hook, YO, and pull through both loops on hook to complete the sc, sc 3 (17)

Rnd 14: sc around (17)

Rnd 15: [invdec, sc] 5 times, sc (12)

Rnd 16: [invdec, sc] 4 times (8)

      Attach safety eyes between rounds 14 and 15.

      Stuff the head

Rnd 16: invdec to close the hole (4)

      FO

Bottom of shirt

Turn the doll upside down.

Join green yarn to one of the free loops at the bottom of the belt.

Rnd 1: sc 4, inc, sc 6, inc, sc 4 (15)

Rnd 2: sc around (15)

Rnd 3: [inc, sc 4] 3 times (18)

      FO, weave in ends


Arms (make 2)

Rnd 1: with skin color, make a magic ring and sc 6 (6)

Rnd 2 – 3: sc around (6)

      Change to medium brown

Rnd 4 – 8: sc around (6)

      Sl st and FO, leaving a long yarn end for sewing.

      Sew arms to body: note that the right arm should be parallel to the floor to hold his shield where the left is his sword arm so it can be more at his side.


Hat (short – see previous post for picture)

With green, make a magic ring and sc 3

Rnd 1: sc 3 (3)

Rnd 2: inc around (6)

Rnd 3: sc around (6)

Rnd 4: [sc 2, inc] 2 times (8)

Rnd 5: sc around (8)

Rnd 6: [sc 2, inc] 2 times, sc, inc (11)

Rnd 7: inc, sc 10 (12)

Rnd 8: sl st 2, sc 2, hdc 2, dc, hdc 2, sc 2, sl st (12)

Rnd 9: invdec, [sc, inc] two times, hdc, 2 hdc in next st, hdc, [inc, sc] 2 times, invdec (15)

Rnd 10: [sc 2, inc] 3 times, sc 3, connect to first st of round with a sl st and FO (18)

Rnd 11: with yellow, [sc 3, inc] 5 times, leaving off the last inc (22)

Rnd 12: sc around (22)

      FO, leaving a long end for sewing.


Hat (long – shown here)

With green, make a magic ring and sc 3

Rnd 1: sc around (3)

Rnd 2: inc, sc around (4)

Rnd 3: inc, sc 2, inc (6)

Rnd 4: [sc 2, inc] 2 times (8)

Rnd 5: [sc 3, inc] 2 times (10)

Rnd 6: sc around (10)

Rnd 7: [sc 4, inc] 2 times (12)

Rnd 8: sc around (12)

Rnd 9: [sc 5, inc] 2 times (14)

Rnd 10: sc around (14)

Rnd 11: [inc, sc] 2 times, [hdc 2 tog, hdc] 2 times, hdc 2, [inc, sc] 2 times (16)

Rnd 12: [inc, sc] 2 times, sc 2, [hdc, hdc 2 tog] 2 times, hdc, sc, [inc, sc] 2 times (18)

Rnd 13: sc 4, inc, 2 hdc in next st, dc, 2 dc tog, 2 dc in next st, 2 dc tog, dc, 2 hdc in next st, inc, sc 4 (22)

Rnd 14: sc 4, inc, hdc, 2 hdc in next st, dc, 2 dc tog, 2 dc in next st, 2 dc tog, dc, 2 hdc in next st, hdc, inc, sc 4 (26)

Rnd 15: change to yellow, sc 9, [hdc, 2 hdc tog] 2 times, hdc, sc 9 (23)

Rnd 16: sc around (23)

      FO, leaving a long end for sewing


Sword

With gold yarn and 2.5 mm crochet hook, make a magic ring and sc 4

Rnd 1 – 5: sc around (4)

Rnd 6: *[ch 3, starting in second ch from hook, sc 2] cross guard side made. Sc 2 into Rnd 5 to secure cross guard to hilt* then repeat from * to * and then sl st to complete hilt. (14 including ch and cross guard sc)

      Change to silver

Rnd 7: sc 4 in round, ignoring cross guard st (4)

Rnd 8 – 17: sc around (4)

Rnd 18: inv dec 2, FO and weave in the end (2)

      May insert a toothpick or bit of wire or piece of a paper clip to give it stiffness, but the sword blade should stand up on its own without support.

      Stitch sword to left hand of doll or you can make a handle for the sword the same way you made one for the shield.


Shield back

With medium brown yarn and 2.5 mm crochet hook, ch 9

Row 1: sc in second chain from hook, sc in each ch across, turn (8)

Row 2 – 8: ch 1, sc across, turn (8)

Row 9: sl st, sc 6, turn (7)

Row 10: sl st, sc 4, turn (5)

Row 11: sl st, sc 2 (3)

Row 12: sc, FO (1)


Shield front

With medium yarn and 2.5 mm crochet hook, ch 9

Row 1: sc in second chain from hook, sc in each ch across, turn (8)

Row 2 – 3: ch 1, sc 3, change to red, sc 2, change to brown, sc 3, turn (8)

Row 4 – 5: ch 1, sc, change to red, sc 6, change to brown, sc, turn (8)

Row 6 – 8: ch 1, sc 3, change to red, sc 2, change to brown, sc 3, turn (8)

Row 9: sl st, sc 2, change to red, sc 2, change to brown, sc 2, turn (7)

Row 10: sl st, sc 4, turn (5)

Row 11: sl st, sc 2 (3)

Row 12: sc, FO (1)


Constructing Shield

Layer the two shield shapes together. Using medium brown yarn and starting at the top corner, sc the two shield shapes together. At each corner, sc on the current side of the corner, ch 1, and then sc on the other side of the angle. Stop at the other top corner.

Insert a piece of cardboard or anything flat and stiff that will help the shield hold it’s shape in between the two layers of shield. Ch 1 for the corner and then sc across the top. Ch 1 and then attach to beginning of round with a sl st. FO and weave in the end.

Shield strap

ch 10 in the color of your choice, sc 9, FO.

Stitch this to the middle back of the shield in a vertical line in the top third of the shield. Make sure the arm of your doll can fit through the strap before sewing down the second end.


Hair

Wrap medium brown (or one shade lighter if you prefer) yarn around a 2” piece of cardboard 14-18 times. Stitch up the middle to make a wig. Position the wig on the doll’s head with the stitch seam going from ear to ear. Arrange the hair so there is about three strands in front of each ear and then gather the remainder of the front hair into a pointy cluster over the right eye. Arrange the back half of the hair evenly behind the ears. You can stitch or glue the wig on, but I just stitched on the hat over the wig to hold the wig in place. Trim hair to page boy length for back and forelocks and to stick out as much as you like in the front, shaping the front bunch to a bit of a point.

Princess Leia (Episode IV)

I did Princess Leia from scratch because I didn’t see any patterns for her anywhere that I liked. This one is VERY loosely based off of Queen Elsa from Disney Frozen Crochet by Kati Galusz (Can you tell I’m a science person? Always have to list your sources!), but mostly I came up with this one from scratch. I also thought I would go ahead and post both of my first two dolls here with their respective patterns. Someone might find it interesting how these things evolve even if that does leave out the twenty changes I made beforehand and between the two patterns!

Please note that I don’t specify an exact color for the skin because I think your Leia should be any color you choose. My iteration 1 doll is Lily Sugar and Cream peach and my second is Vanna’s Choice beige (Lion brand). I actually emailed several companies that produce yarn complaining that they don’t make any flesh tones. I just want a warm brown, darn it! I got a very surprisingly nice response back from Coats Group (manufacturer of Red Heart yarns) saying that they actually looked into it, agreed they didn’t make any brown yarns with rosy undertones, and suggested it might be a good addition to their line up for 2018. Lion Brand yarn gave me a more generic “I will pass your comments along to our design department” that was still more than I was expecting. Yarnspirations (manufacturers of Bernat and Caron yarn- Caron soft is my favorite yarn in terms of its texture) sent me the more expected response of yeah, yeah, look at our list and go away. I made an amigurumi doll of Falcon from the Marvel Universe and the dark brown I used for his skin kinda made him look like a tree because it was such a cold brown.

I like the Lily Sugar and Cream yarn for flesh texture because the cotton is so much different from the acrylic yarns I use for almost everything else, but it is less stretchy so it’s a little harder to work with on smaller bits (like hands- I stitch tightly), but they don’t have any good darker flesh tones (like anything darker than the whitest Caucasian). I don’t know if anyone else has my same pet peeves about warm and cold blues and browns, but I definitely like warmer colors for toys and blankets!


Materials

All yarns are worsted weight: white, silver, skin tone, dark brown, a tiny scrap of red (may be yarn or embroidery floss for the mouth).

3.5 mm E crochet hook

brown 6 mm safety eyes

polyester fiberfill


Princess Leia (iteration 1)

Basic Doll

Legs (make 2)

Rnd 1: With white, make a magic ring and sc 8 (8)

Rnd 2: sc 3, 3 dc bobble st 2, sc 3 (8)

Rnd 3 – 4: sc in each st (8)

Rnd 5: sc around, attach to first st of round with sl st and fasten off (8)

Change to skin color

Rnd 6: sc 3, inv dec, sc 4 (8)

Rnds 7 – 9: sc in each st (7)

sl st in next st and FO

stuff the legs.


Body and Head

Rnd 1: With white,  join the legs and sc 5, sc tog, sc 5, sc tog (12)

Rnd 2: sc 2, hdc 2, sc, sl st 2, sc, hdc 2, sc 2 (12)

Rnd 3: in BLO, sc 5, hdc 2, sc 5 (12)

Change to silver

Rnd 4: sc 4, 2 dc bobble, sc, 3 dc bobble, sc, 2 dc bobble, sc 3 (12)

Change to white

Rnd 5: sc around (12)

Rnd 6: sc 5, inc, sc 2, inc, sc 3 (14)

Rnd 7: [invdec, sc 5] 2 times  (12)

Stuff the body

Rnd 8: invdec 6 (6)

Rnd 9: inc 6 (12)

Change to skin color

Rnd 10: [sc, inc] 6 times (18)

Rnd 11 – 14: sc around (18)

Rnd 15: [invdec, sc] 6 times (12)

Attach safety eyes between rounds 12 and 13.

Stuff the head

Rnd 16: invdec 6 (6)

FO and close the hole


Three skirt styles follow: Choose one or make three copies of the rest of the doll! I originally based my skirt off of what turned out to be a Halloween costume version of the dress. I believe the dress in the movie actually did not have slits at all and I did not add the hood at all since she only wears it briefly in the one scene. The dolls pictured here are both with long slits.

Skirt 3 (no slits)

Turn the doll upside down.

Join white yarn to the free loop above the front middle of the doll’s left leg.

Rnd 1: sc 5, 3 sc in next loop, sc 5, inc (15)

Rnd 2: sc around (15)

Rnd 3: [inc, sc 4] 3 times (18)

Rnd 4: sc around (18)

Rnd 5: [inc, sc 4] 3 times, sc 3 (21)

Rnd 6: sc around (21)

Rnd 7: [inc, sc 6] 3 times (24)

Rnd 8 – 9: sc around (24). You can adjust the length of the dress to suit your style and doll by doing more or fewer of this round.

FO, weave in ends.


Skirt 2 (shorter slits)

Turn the doll upside down.

Join white yarn to the free loop above the front middle of the doll’s left leg.

Rnd 1: sc 5, 3 sc in next loop, sc 5, inc (15)

Rnd 2: sc around (15)

Rnd 3: [inc, sc 4] 3 times (18)

Rnd 4: sc 12, turn. You now have an unfinished round and should work in rows. Since this version of Leia’s dress has two slits, we’ll do the back two thirds of the dress and then come back to this partial round to make the front panel.

Back Row 1: ch 1, [inc, sc 5] 2 times, inc, turn (16)

Back Row 2 – 5: ch 1, sc 16, turn (16)

Back Row 6: ch 1, sc 16, fasten off and weave in end.

Attach white yarn at round 4 in the first free loop above the middle of the right leg.

Front Row 1: ch 1, sc 2, inc, sc 3, turn (7)

Front row 2 – 3: ch 1, sc 7, turn (7)

Front row 4: ch 1, sc 3, inc, sc 3, turn (8)

Front row 5: ch 1, sc 8, turn (8)

Front row 6: ch 1, sc 8, fasten off and weave in end.


Skirt 1 (shown here, longer slits)

Turn the doll upside down.

Join white yarn to the free loop above the front middle of the doll’s left leg.

Back Row 1: sc 12, turn. You now have an unfinished round and should work in rows. Since this version of Leia’s dress has two slits, we’ll do the back two thirds of the dress and then come back to this partial round to make the front panel.

Back Row 2: ch 1, sc 12, turn (12)

Back Row 3: ch 1, inc, sc 4, inc, sc 5, inc, turn (15)

Back Row 4: ch 1, sc 15, turn

Back Row 5: ch 1, inc, sc 14, inc, turn (17)

Back Row 6 – 10: ch 1, sc 17, turn (17)

At the end of row 10, fasten off and weave in the end.

Front Row 1: attach white yarn in first free loop above the middle of the right leg, sc 3, turn (3)

Front Row 2: ch 1, inc, sc, inc, turn (5)

Front Row 3 – 5: ch 1, sc 5, turn

Front Row 6: ch 1, sc 4, inc, turn (6)

Front Row 7 – 8: ch 1, sc 6, turn (6)

Front Row 9: ch 1, inc, sc 4, inc, FO and weave in ends (8)


Arms (make 2)

Rnd 1: with skin color, make a magic ring and sc 6 (6)

Rnd 2 – 3: sc around (6)

Change to white

Rnd 4: sc around (6)

Rnd 5:  in BLO, sc around (6)

Rnd 6 – 8: sc around (6)

Sl st and FO, leaving a long yarn end for sewing.

Turn arm upside down.

Sleeve Rnd 1: Attach white yarn to free loop, inc, sc 2, inc, sc 2 (8)

Sleeve Rnd 2: sc 3, hdc, 2 dc in next st, hdc,  sc, sl st (9)

Sleeve Rnd 3: sc 2, inc, sc, inc, sc 3, sl st (11)

Fasten off and weave in end.

Sew arms to body


Hair cap

Rnd 1: With dark brown, make a magic ring and sc 8 (8)

Rnd 2: inc in each st (16)

Rnd 3: [inc, sc] 8 times (24)

Rnd 4-7: sc around (24)

FO and leave a long end for sewing

Sew to the top/back of the doll’s head, paying attention to putting the leading edge at the desired distance above the doll’s eyes. I find that a simple in and out stitch (I am NOT a sewing person, I don’t know the right term here!) through the two loops of the outermost row of single crochet st of the hair cap and around a loop of the “skin” looks better than a whip stitch. (Doll 1 is shown with whip stitch edge and doll 2 is shown with the described stitch)

Buns

Rnd 1: With dark brown, make a magic ring and sc 6 (6)

Rnd 2: in BLO, inc around (12)

Rnd 3: in BLO, [sc, inc] 6 times (16)

Rnd 4: in BLO, [sc7, inc] 2 times (18)

Rnd 5: sc around (18)

Rnd 6: inv dec around (9)

FO and leave a long end for sewing. Sew the buns to the sides of the head/hair cap.


Princess Leia (iteration 2)

Basic Doll

Legs (make 2)

Rnd 1: With white, make a magic ring and sc 8 (8)

Rnd 2: sc 3, 3 dc bobble st 2, sc 3 (8)

Rnd 3 – 4: sc in each st (8)

Rnd 5: sc around, attach to first st of round with sl st and fasten off (8)

Change to skin color

Rnd 6: in BLO, sc 3, inv dec, sc 4 (7)

Rnds 7 – 9: sc in each st (7)

sl st in next st and FO

Lightly stuff the legs.


Body and Head

Rnd 1: With white,  join the legs and sc 5, sc tog, sc 5, sc tog (12)

Rnd 2: sc 2, hdc 2, sc, sl st 2, sc, hdc 2, sc 2 (12)

Rnd 3: sc 5, hdc 2, sc 5 (12)

Change to silver

Rnd 4: in BLO, sc 5, 2 dc bobble, sc, 3 dc bobble, sc, 2 dc bobble, sc 3 (12)

{Alt Rnd 4: Note that I did the following tiny change in the doll pictured here and I don’t think it worked that well, hence the Rnd 4 listed above, but since this is what is pictured, here’s what I did: in BLO, sc 5, 2 dc bobble, sc, In both loops 3 dc bobble, in BLO sc, 2 dc bobble, sc 3 (12)}

Change to white

Rnd 5: sc around (12)

Rnd 6: sc 5, inc, sc 2, inc, sc 3 (14)

       Note that the inc stitches in Rnd 6 are very very subtle breasts. You could change them to a 2 dc bobble and then leave out the first invdec stitch in Rnd 7 (the second one goes between the breasts so it is actually for looks) if you want to make them more defined.

Rnd 7: [invdec, sc 5] 2 times  (12)

Stuff the body

Rnd 8: invdec 6 (6)

Rnd 9: inc 6 (12)

Change to skin color

Rnd 10: [sc, inc] 6 times (18)

Rnd 11 – 14: sc around (18)

Rnd 15: [invdec, sc] 6 times (12)

Attach safety eyes between rounds 12 and 13.

Stuff the head

Rnd 16: invdec 6 (6)

FO and close the hole


Skirt (two long slits)

Turn the doll upside down.

Join white yarn to the free loop above the front middle of the doll’s left leg.

Back Row 1: sc 11, turn. You now have an unfinished round and should work in rows. Since this version of Leia’s dress has two slits, we’ll do the back two thirds of the dress and then come back to this partial round to make the front panel.

Back Row 2: ch 1, sc 11, turn (11)

Back Row 3: ch 1, inc, sc 4, inc, sc 5, inc, turn (14)

Back Row 4: ch 1, sc 14, turn

Back Row 5: ch 1, inc, sc 13, inc, turn (16)

Back Row 6 – 10: ch 1, sc 16, turn (16)

At the end of row 10, fasten off and weave in the end.

Front Row 1: attach white yarn in first free loop above the middle of the right leg, sc 3, turn (3)

{Alt Front Row 2: Since I did the belt slightly differently, it changed this row too. I actually did: sc in first free loop over doll’s right leg, sc in loop of 3 dc bobble from body Rnd 4, sc in white free loop (3)}

Front Row 2: ch 1, inc, sc, inc, turn (5)

Front Row 3 – 5: ch 1, sc 5, turn

Front Row 6: ch 1, sc 4, inc, turn (6)

Front Row 7 – 8: ch 1, sc 6, turn (6)

Front Row 9: ch 1, inc, sc 4, inc, FO and weave in ends (8)


Arms (make 2)

Rnd 1: with skin color, make a magic ring and sc 6 (6)

Rnd 2 – 3: sc around (6)

Change to white

Rnd 4: sc around (6)

Rnd 5:  in BLO, sc around (6)

Rnd 6 – 8: sc around (6)

Sl st and FO, leaving a long yarn end for sewing.

Turn arm upside down.

Sleeve Rnd 1: Attach white yarn to free loop, inc, sc 2, inc, sc 2 (8)

Sleeve Rnd 2: sc 3, hdc, 2 dc in next st, hdc,  sc, sl st (9)

Sleeve Rnd 3: sc 2, inc, sc, inc, sc 3, sl st (11)

Fasten off and weave in end.

Sew arms to body


Note on the hair and hair cap: Doll iteration 1 shown here has the buns combined with the hair cap. Doll iteration 2 has the hair cap shown with the hair stitched over it. You could do the hair without the hair cap, but I had trouble hiding the scalp as completely as I would like with previous dolls. I created the hair cap to improve the appearance. If you are a better sewer (is that the word I want or do I want seamstress??) than I am, please feel free to leave off the hair cap. If you find the hair to be overkill, you can of course do the hair cap without the hair as shown in Doll 1.

Hair cap

Rnd 1: With dark brown, make a magic ring and sc 8 (8)

Rnd 2: inc in each st (16)

Rnd 3: [inc, sc] 8 times (24)

Rnd 4-7: sc around (24)

FO and leave a long end for sewing.

Sew to the top/back of the doll’s head, paying attention to putting the leading edge at the desired distance above the doll’s eyes. I find that a simple in and out stitch (I am NOT a sewing person, I don’t know the right term here!) through the two loops of the outermost row of single crochet st of the hair cap and around a loop of the “skin” looks better than a whip stitch. (Doll 1 is shown with whip stitch edge and doll 2 is shown with the described stitch).

Hair (Optional, shown on Doll 2)

Choose the point on the side of the doll’s head where you plan to attach the buns and attach dark brown yarn here. Make long stitches from here to the middle of the doll’s “scalp” and back to the point selected on the side of the head, forming the part in Leia’s hair. Each stitch to the middle will be at a slightly different point of the part, but each stitch to the bun area will go around the same stitch where you will attach the bun. I stitch starting from the brow and going to the nape of the neck because I like how it looks, but I am totally self taught when it comes to sewing (I guess I’m basically self taught on crochet as well, but there at least I used books to help me).

Buns

Rnd 1: With dark brown, make a magic ring and sc 6 (6)

Rnd 2: in BLO, inc around (12)

Rnd 3: in BLO, [sc, inc] 6 times (16)

Rnd 4: in BLO, [sc7, inc] 2 times (18)

Rnd 5: sc around (18)

Rnd 6: inv dec around (9)

FO and leave a long end for sewing. Lightly stuff the buns with polyfill depending on how much you want them to stick out. {In Doll 1, I didn’t stuff the buns at all and then stitched the buns down in the middle. In Doll 2, I lightly stuffed the buns and stitched them on with the stitches only going through Rnd 6 of the bun.}

Sew the buns to the sides of the head/hair cap, covering the point where all the hair comes together.

Embroider a mouth on the doll.


Storm Trooper

So Vader pattern written, attempted and then re-written and posted!

I started in on following the pattern I had for a storm trooper. Ugh. The first problem was stupid looking eyes. I looked at pictures of Vader and of Storm Troopers and decided I needed triangle shaped eyes. I found circular eyes and oval eyes and… ah! noses! Bear noses, to be exact. Triangular, readily available and cheap. Excellent.

I ordered a variety of nose sizes and worked on other dolls while I waited for them. I went back to the storm trooper head I had already started, added the noses in place of eyes and continued crocheting. When I got to the waist- Ugh. Fake legs again! The pattern called for stitching a skirt and then stitching up the middle to make it look like legs. Boo.

I knew how to make legs now, though! I’ll even be super fancy and give him KNEES. Ugh. How do I get the legs onto the body when working from both ends? I hate sewing. I know! I’ll just crochet them together! Ugh. I have to sew on the arms anyways. Uh, oh. The pattern for the head and torso made a slightly bigger doll than the legs and arms. The result is a bit odd looking.

IMG_3401

Before starting another storm trooper, I wrote out a pattern bottom to top. The result is much better although this guy is clearly eating too many cookies (or I lost track and his torso has too many stitches!).

Storm Trooper 1A

Storm Trooper

Legs (make 2)

Rnd 1: with white: Make a magic ring and sc 8 (8)

Rnd 2: sc 3, bobble st 2, sc 3 (8)

Rnd 3: sc in each st (8)

Rnd 4: sc 5, change to black sc 3 (8)

Rnd 5: sc 3, change to white, sc 5 (8)

Rnds 6 – 8: sc in each st (8)

Rnd 9: change to black, sc in each st (8)

sl st in next st and FO

Stuff the legs.


Body and Head

Rnd 1: with white, join the legs and sc around (14)

Rnd 2: [inc, sc 6] twice (16)

Rnd 3: [sc, 2dc bobble] 8 times (16)

Rnds 4 – 6: sc around (16)

Rnd 7: [invdec, sc 2] 4 times (12)

Stuff the body

Rnd 8: change to black, invdec 6 (6)

Rnd 9: inc 6 (12)

Rnd 10: change to white [sc, inc] 6 times (18)

Rnd 11: [sc 2, inc] (24)

Rnd 12: sc 4, 2 dc bobble in next 5 st, sc 7, 2 dc bobble next 5 st, sc 3 (24)

Rnd 13: [sc 2, invdec] 4 times, sc 4 (20)

Rnds 14 – 15:  sc around (20)

Rnd 16: sc 5, change to black, sc 10, change to white , sc 5 (20)

Rnd 17: [invdec, sc 3] 4 times (15)

Rnd 18: [invdec, sc 2] 4 times (12)

Attach two bear noses for mask eyes between rounds 13 and 14.

Stuff the head

Rnd 19: invdec 6 (6)

FO and close the hole


Arms (make 2)

Rnd 1: with black, make a magic ring and sc 6 (6)

Change to white

Rnd 2 – 4: sc around (6)

Rnd 5: Change to black, sc around (6)

Rnd 6 – 7: Change to white, sc around (6)

Rnd 8: Change to black, sc around (6)

Sl st and FO, leaving a long end for sewing

Sew arms to body


If you look at my picture really carefully, you’ll notice it doesn’t perfectly follow my pattern. *sheepish grin* I’ll make another one to take a picture of eventually! I did two rounds for the hands on the doll in the picture which I decided is too much and I accidentally added extra stitches somehow, giving the chubby look. The pattern written is for version 3.0 and you’ll have to use your imagination for now!


Darth Vader

Maybe the dark side is an ominous way to start a blog, but this particular character is what motivated me to create my first crochet patterns and ultimately, to write this blog. I have been crocheting since 2005 when my teenage physics students asked me to sponsor the knitting and crocheting club. I had done plastic canvas and cross stitch as well as spinning and weaving so I was definitely open to adding another fiber art to my repertoire. My kids taught me the basics and then went on to teach others so I sought out books and patterns. For a long time I stuck to doilies, ponchos, and scarves. I switched to baby clothes when I was (predictably) pregnant and then took a long hiatus because kids are time consuming!

Fast forward to last fall. I was in Cost co, of all places, when I saw several adorable kits for making crocheted amigurumi dolls. Suddenly captivated and motivated, I happily turned out the majority of the cast of the old claymation Rudolf the Red nosed Reindeer and Frozen, much to the delight of my daughter. Then I bought a Star Wars kit.

I hated the patterns. Luke and Leia looked like aliens and neither had real legs. I altered the patterns a little on the fly to make them taller and to give them better faces, but I wasn’t happy with them and I didn’t write down my alterations. I mailed those to my niece for Christmas and her mother was delighted with them, but I didn’t make any more of the set despite having patterns for ten other characters. I moved on to other dolls, but then I was given the kit “Even More Star Wars Crochet” for my birthday. Ugh, same writer, same unlikeable style!

So Lucy Collins might someday read this blog and defend her style and her patterns and really, it’s a taste thing not an error thing, but I do want to credit her with inspiring me. I took elements of how the wonderful dolls were made by Kati Galusz in “Marvel Universe Crochet” and elements of how the dolls were made in Lucy Collins’ “Star Wars Crochet” and “Star Wars Even More Crochet” but then I drastically altered them in most cases.

I have no timeline for creating these patterns and they are a work in progress so feel free to let me know if something didn’t work. I’m not totally happy with my Darth Vader pattern yet so I will probably have another go at him in a later post, but here is my second iteration.


Darth Vader

Legs (make 2)

Rnd 1: with black yarn, make a magic ring and sc 8 (8)

Rnd 2: sc 3, bobble st 2, sc 3 (8)

Rnd 3: sc in each st (8)

Rnd 4: sc in each st, join, ch 1 (8)

Rnd 5: working in back loop only (BLO), sc 2, sc2tog, sc 2, sc2tog, join, ch1

Rnd 6 – 9: sc in each st (6)

sl st in next st and FO

stuff the legs.


Body and Head

Rnd 1: join the legs and sc around (14)

Rnd 2: [inc, sc 6] twice (16)

Change to silver

Rnd 3 – 4: sc around (16)

Change to black

Rnd 5 – 7: sc around (16)

Rnd 8: [invdec, sc 2] 4 times (12)

Stuff the body

Rnd 9: invdec 6 (6)

Rnd 10: inc 6 (12)

Rnd 11: [sc, inc] 6 times (18)

Rnd 12: [sc 2, inc] 6 times (24)

Rnd 13 – 17: sc around (24)

On the last round, join, ch 1

Rnd 18: working in BLO, sc around (24)

Rnd 19: sc around (24)

Rnd 20: [invdec, sc 2] 6 times (18)

Attach two medium noses as eyes between rounds 12 and 13.

Stuff the head

Rnd 21: [invdec, sc] 6 times (12)

Rnd 22: invdec 6 (6)

FO and close the hole

Using silver yarn, add two vertical stripes to the doll’s chest.

Using red and green yarn add lights to the chest and belt.


Helmet

Working in FLO of Rnd 17, count 4 st from the center of the forehead to the left side of the doll’s face and join black yarn.

Row 1 – 2: sl 7 to make brow of helmet, sc 20, ch 1, turn (20)

Row 3: [sc 3, inc] 4 times, sc 5, ch 1, turn (22)

Row 4 – 5: sc 22, ch 1 turn (23)

Row 6: skip first st, sc 20, sl st, FO, leaving a long end for sewing

Sew the edge of the helmet to the head. Make a couple of stitches on each side about halfway up, then add a few st over the middle of the brow to define it.


Arms (make 2)

Rnd 1: with black, make a magic ring and sc 6 (6)

Rnd 2: sc around (6)

Rnd 3 – 10: sc around (6)

Sl st and FO, leaving a long yarn end for sewing

Sew arms to body


Face Mask

Magic ring 3 dc, do not join, leaving a long end for sewing

Sew on face mask in a triangle shape


Crocheted cape (may make felt cape and sew to body)

Leave a long yarn end, make a slip knot, then ch 16

Row 1: Working in the back ridge of ch, sc in second ch from hook, sc 10, sl st ch 1 turn (12 st, plus 3 unworked ch)

Row 2: sc 5, hdc, dc 5, ch1, turn (12)

Row 3: sc 11, sl st, ch 1, turn (12)

Row 4, 6, 8, 10: Repeat row 2

Row 5, 7, 9: Repeat row 3

Row 11: sc 11, sl st, ch 3 (12 st, plus 3 ch)

FO leaving a long end for sewing

Sew the ends of the chains to the chest just in front of the arms.


Lightsaber

Handle

Row 1: ch 4, sc in second ch from hook, sc 2, ch 1, turn

Row 2: sc 3, ch 1 turn

Row 3: sc Row 2 into row one to form the handle.

FO and Leave a long end for sewing

Blade

Attach red yarn to end of handle

Row 1: ch 10, sc in second ch from hook, sc 2, sl into handle, ch 1, turn

Row 2: sc 9, ch 1 turn

Row 3: sl st Row 2 into row one to form the handle. Sl st into handle, FO, weave in ends

FO and Leave a long end for sewingVader Doll 2