I wrote a pattern for the Zelda from the first game, but somehow I just haven’t gotten around to making her yet. I definitely need to try my pattern because there are inevitably things that don’t work quite right and I tweak the pattern. I’m working on Impa from this same game right now and my first “draft” of her and Sheik REALLY did not go well. Usually I try a few rows and then pull it out and change it if I wasn’t happy with it, but if I get too far along like I did with Sheik and Impa and I’ve already put in the safety eyes, then I just finish it and experiment a bit more. On my first draft of Sheik I tried puffy paint versus stitching the silver accents with yarn (each on half the body) and decided that I liked the yarn better, but I still used paint for the design on her chest because I just don’t think my poor embroidery skills are up to that.
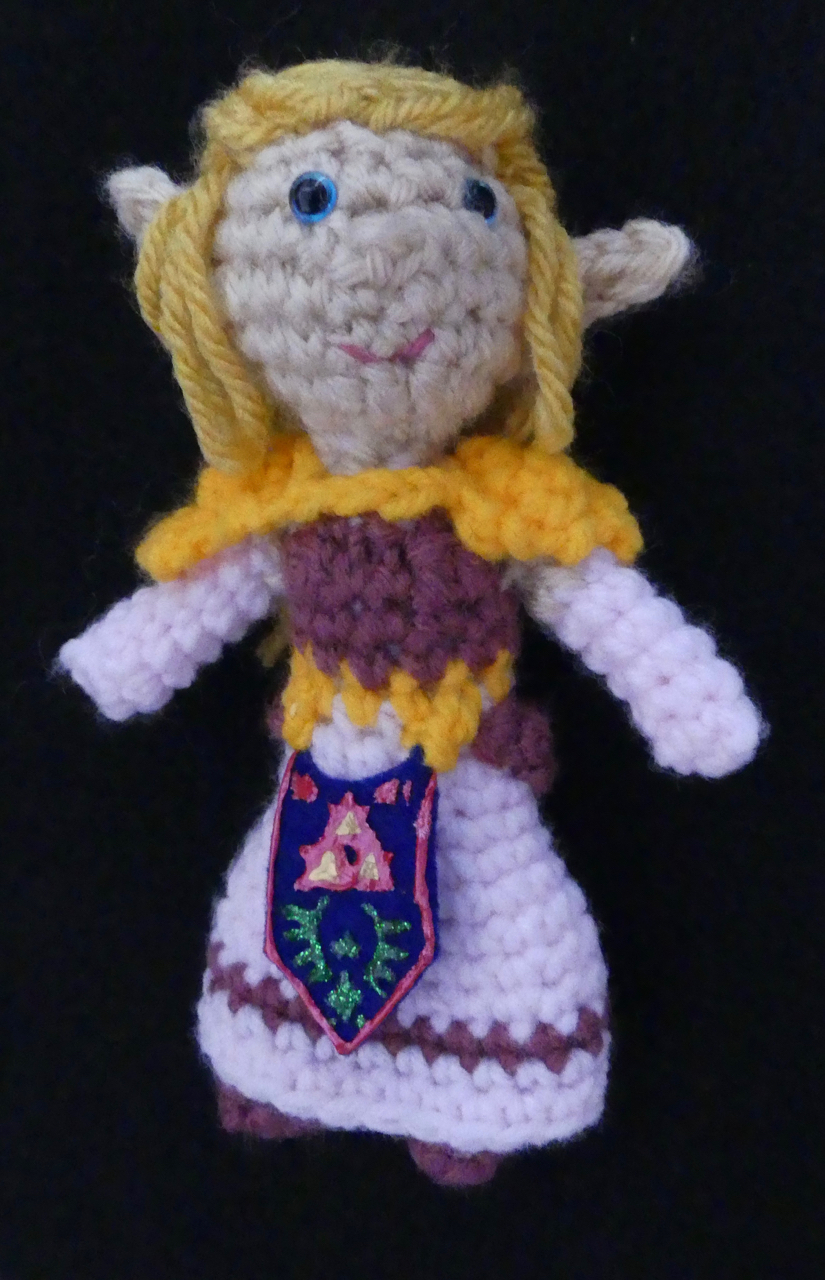
Here is the adult Princess Zelda from The Legend of Zelda: The Ocarina of Time. This game seems to have had more love in general from my friends and family so I decided to make a number of the characters. Zelda is my first one from this game and she will be followed shortly by Sheik (already done), Impa (two thirds done), Link, and my first attempt at Ganondorf. I haven’t decided if I’m going to do Rauru or Kaepora Gaebora yet. If anyone is actually reading this blog and wants to request a character, please do send me a request, but for now keep it to Ocarina of Time or earlier. I have plans to get to Breath of the Wild for sure and I want to attempt Wind Waker even though I haven’t yet figured out how I will get the cartoony appearance to work with the dolls.
As I am composing the post here, I notice that I improved the appearance of the face by moving the nose (and therefore the eyes) down a row and changing the nose a little bit. I will change the pattern below to reflect the better appearance you will see in Sheik and Impa and even my Link from A Link to the Past, but I will put the original pattern for the head below. If you like the arrangement of Zelda’s features in the pictures below, please look for the alternate instructions at the end for the head. Also note that my doll is looking over to her left a bit. You can adjust your doll to have the head pointed wherever you you like- just put the middle of the chin in the direction you want the head to point and then center the ears, nose and eyes according to that.
Without further ado, here is my first pattern for the games’ namesake.
Zelda (The Legend of Zelda: Ocarina of Time)
Worsted weight yarn colors needed: dark pink for top and stripe in dress, dress itself should be very pale pink or very pink lavender. Also need skin tone, gold, light brown
Safety eyes
Polyfill
Blue felt for apron
Red, gold, and green puffy fabric paint or embroidery floss
Glue or embroidery floss to attach apron
Legs (make 2)
Rnd 1: With dark pink, make a magic ring and sc 6 (6)
Rnd 2: sc around (6)
Rnd 3: sc 4, 2 dc bobble 2 (6)
Change to skin color
Rnd 4 – 9: sc in each st (6)
sl st in next st and FO
Lightly stuff the legs.
Body and Head
Rnd 1: With light pink, join the legs and sc around (12)
Rnd 2: sc 2, hdc 2, sc, sl st 2, sc, hdc 2, sc 2 (12)
Rnd 3: in BLO, sc 5, in both loops, hdc 2, in BLO, sc 5 (12)
Change to gold
Rnd 4: in BLO, sc around (12)
Change to dark pink
Rnd 5-6: sc around (12)
Rnd 8: sc 4, 2 dc bobble, sc 2, 2 dc bobble, sc 4 (12)
Rnd 9: sc 2, change to light pink, sc 2, change to dark pink, sc 2, inv dec, sc 2, change to light pink, inc, change to dark pink, sc 2 (12)
Stuff the body
Change to light pink
Rnd 8: invdec 3, change to skin color, invdec, change to light pink, invdec 2 (6)
Change to skin color
Rnd 9: sc around (6)
(Note: Alternate pattern for the doll shown here in the pictures as opposed to the arrangement of features of face as in Link from A Link to the Past and Impa and Sheik from Ocarina of Time is below the end of the pattern. Go to that section now to make the doll’s head exactly as seen in these pictures)
Rnd 10: inc 6 (12)
Rnd 11: [sc, inc] 2 times, sc, [sc, hdc] in next st, dc, [hdc, sc] in next st, [sc, inc] 2 times (18)
Rnd 12: sc 4, [ch 5, working in back loop of ch, sl st in second chain from hook, sc 2, hdc, dc, next sc in Rnd] ear made, sc 5, [ch 2, sl st, sc in back loop of sc] nose made, sc 4, repeat ear, sc 4 (18, not including nose and ears)
Rnd 13: sc 4, invdec over ear, catching the rear most and front most st, sc 2, inc, sc, skip nose and sc on the other side of it, inc, sc 3, invdec over ear catching the front and rear st of ear, sc 3 (18)
Rnd 14: sc 4, insert your hook into the loop from side/back of ear to make it stand up, then put your hook into the next sc in round, draw up a loop, pull this loop through the first two loops on the hook, YO, and pull through both loops on hook to complete the sc, sc 10, insert your hook into the loop from side/back of ear to make it stand up, then put your hook into the next sc in round, draw up a loop, pull this loop through the first two loops on the hook, YO, and pull through both loops on hook to complete the sc, sc 3 (18)
Rnd 15 – 16: sc around (18)
Rnd 17: [invdec, sc] 6 times (12)
Attach safety eyes between rounds 14 and 15 on either side of the nose.
Stuff the head
Rnd 18: invdec around (6)
FO, weave in the end


Skirt
Turn the doll upside down.
Join light pink yarn to the free loop above the front middle of the doll’s left leg that is lower on the torso (the upper loop will be for the shirt bottom).
Rnd 1: sc 5, 3 sc in next loop, sc 4, in higher loops in the middle of the bottom of the belt, 3 dc (15)
Rnd 2: sc around (15)
Rnd 3: [inc, sc 4] 3 times (18)
Rnd 4: sc around (18)
Rnd 5: [inc, sc 4] 3 times, sc 3 (21)
Rnd 6: sc around (21)
Rnd 7: [inc, sc 6] 3 times (24)
Rnd 8: sc around (24). You can adjust the length of the dress to suit your style and doll by doing more or fewer of this round.
Rnd 9: sc 10, change to dark pink, sc 14 (24)
Rnd 10: sc 10, change to light pink, sc 14 (24)
Rnd 11: sc around (24)
Rnd 12: sc 11, sl st 5 (16) partial round.
FO, weave in ends.


Shirt Bottom
Turn the doll upside down.
Join dark pink yarn to the free loop just below the belt, above the front middle of the doll’s left leg.
Row 1: sc 4, inc 2, sc 4, sl st in same st, turn. You now have an unfinished round which counts as the first row. (12)
Row 2: ch 1, sl st, sc 10, sl st, turn (12)
Row 3: ch 1, sl st, inc, sc 5, inc, sl st 2 (12)
FO, weave in ends.


Arms (make 2)
With pale pink, make a magic ring, sc 6
Rnd 1-6: sc around (6)
Rnd 7: change to skin color, sc around (6)
Rnd 8: sc around (6)
FO, leaving a long end for sewing.
Stitch arms to body.
Shoulder guards (make 2)
With gold yarn, ch 10. Leave a long tail at the beginning of the chain for sewing.
Row 1: Sl st, sc, hdc, dc, sc, sl st (6)
Row 2: Sl st, sc, hdc, sc, sl st (6)
Row 3: in BLO, sc, hdc, sc (3)
Row 4: ch 1, sc, hdc, sc (3)
Row 5: ch 1, sc in middle st of row, sl st, FO (2)
The unworked ch from each of the two pieces will link into the side of the shoulder guard that lacks chain stitches. Thus the chain from one shoulder guard will go across the back of the doll’s neck and the chain from the other shoulder guard will go across the front of the neck. Use the long end of the yarn to stitch the chain from one shoulder guard into the other shoulder guard and then to stitch the shoulder guard to the doll. The unworked ch stitches can remain loose or be stitched down.


Hair
Wrap dark yellow or gold yarn around a 3” piece of cardboard about 18 times. Stitch up the middle to make a wig. If you want your doll to have a smooth, polished look, then carefully iron the wig (low temp to avoid melting the acrylic yarn) so the hair is straight (not shown here). Position the wig on the doll’s head with the stitch seam creating a centered part. Arrange the hair so there is about three strands in front of each ear. Arrange the back half of the hair evenly behind the ears. You can stitch or glue the wig on (I’d recommend doing both). Even out the back hair to go about half way down the doll’s back. The forelocks (bit of hair in front of the ears) should be about shoulder length. The front should be gathered into a half ponytail in the back of the head.


Apron
Cut apron shape out of dark blue or purple felt. I drew the design with fine tip puff paint because I hate sewing, but if you want to embroider the design or leave it blank, go ahead and make it yours. I attached the apron with yellow embroidery floss, using a two ch bit of gold yarn to cover the attach points.


Alternate Head Design (shown in images here)
Complete the legs and torso as above
Rnd 10: inc 6 (12)
Rnd 11: [sc, inc] 2 times, [sc, hdc] in next st, dc (this is the point of the chin and should be centered), [hdc, sc] in next st, [sc, inc] 2 times (18)
Rnd 12: sc 4, [ch 5, working in back loop of ch, sl st in second chain from hook, sc 2, hdc, dc, next sc in Rnd] ear made, sc 10, ear, sc 4 (18)
Rnd 13: sc 4, invdec over ear, catching the rear most and front most st, sc 4, [ch 3, sl st in second chain from hook, next sc in Rnd] to make a nose, sc 4, invdec over ear catching the front and rear st of ear, sc 3 (16 st not including nose)
Rnd 14: sc 4, insert your hook into the loop from side/back of ear to make it stand up, then put your hook into the next sc in round, draw up a loop, pull this loop through the first two loops on the hook, YO, and pull through both loops on hook to complete the sc, sc 4, skip nose and sc on the other side of it, sc 4, insert your hook into the loop from side/back of ear to make it stand up, then put your hook into the next sc in round, draw up a loop, pull this loop through the first two loops on the hook, YO, and pull through both loops on hook to complete the sc, sc 3 (17)
Rnd 15: sc around (17)
Rnd 16: [invdec, sc] 5 times, sc (12)
Rnd 17: [invdec, sc] 4 times (8)
Attach safety eyes between rounds 14 and 15.
Stuff the head
Rnd 18: invdec to close the hole (4)
