I made a number of Legend of Zelda dolls recently, improving them as I went. The doll in my previous post vanished! I had him in my purse and then he was gone. I also had only taken pictures of him with my phone. I left the post intact because his hat and nose were a little different. The revamped pattern here has a lot more pictures with it and I also created a design for the sword and shield.
One thing I did notice AFTER I had made the second doll and took all the nicer pictures though- Link isn’t wearing any pants! The picture I based my pattern on (see below) shows the legs as yellow. When I looked up the game in my Legend of Zelda Art and Artifact book, Link clearly has bare legs. Ah well. Make him how you see fit.


Enjoy!
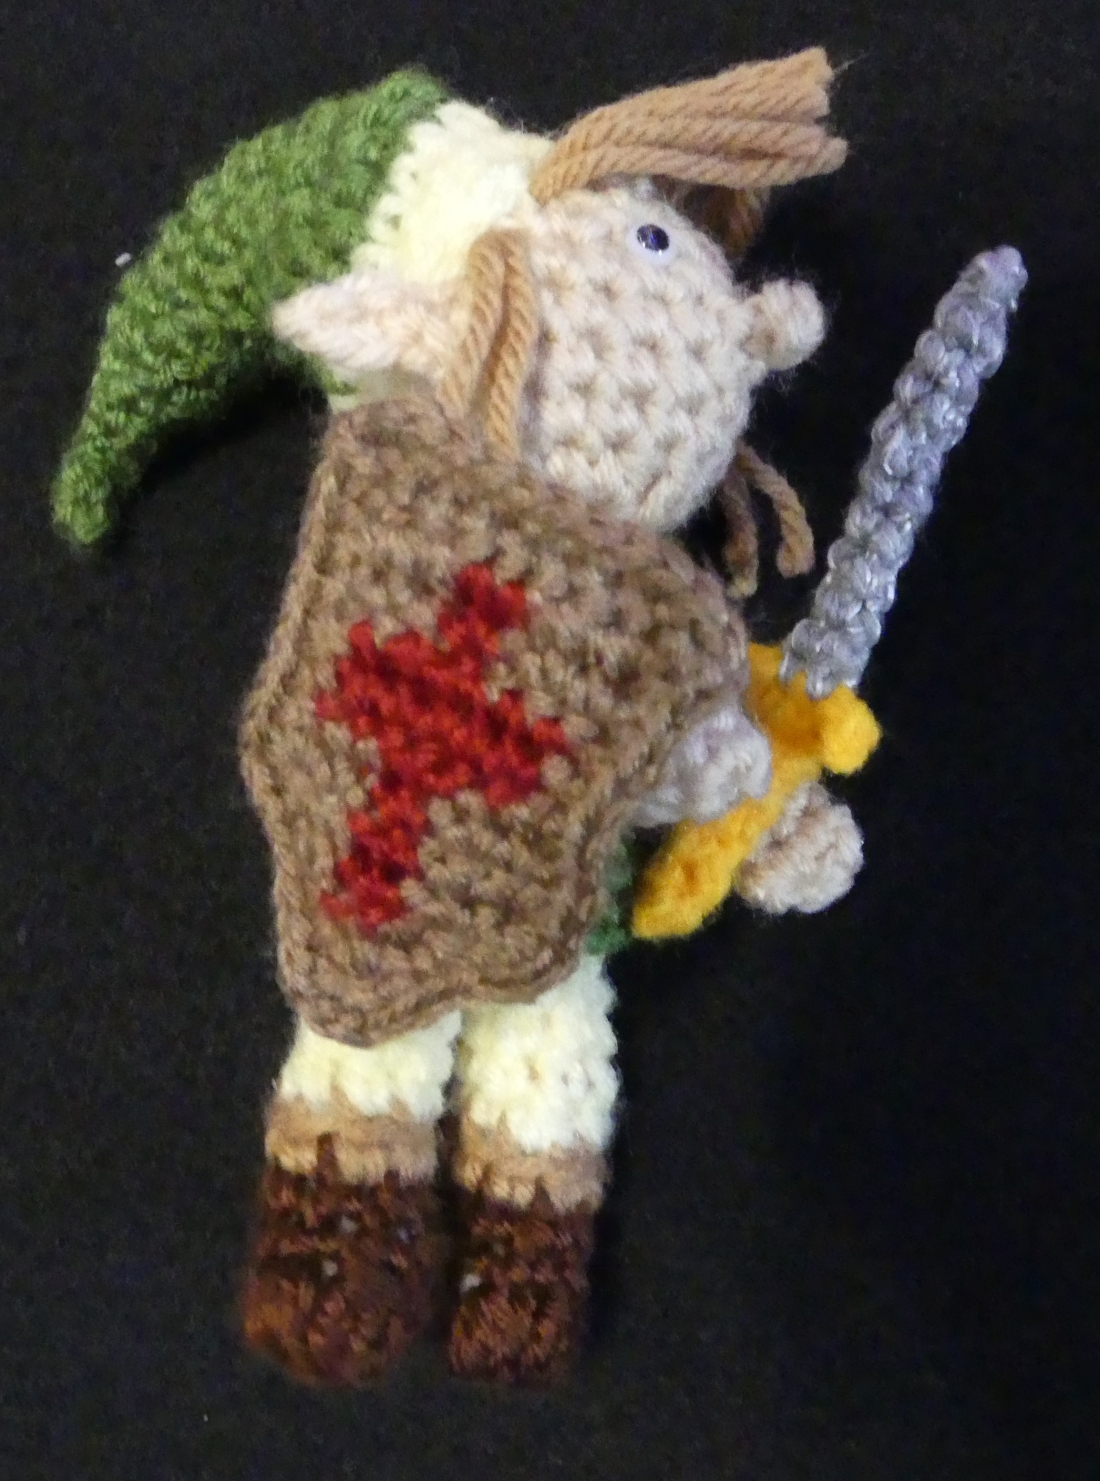
Link (Original appearance, The Legend of Zelda)
Materials
Dark brown, medium brown, yellow, skin tone, silver, gold, red, and yellow worsted weight yarn.
3.5 mm E crochet hook (use unless otherwise noted) and 2.5 mm C crochet hook (only where noted)
Safety eyes
Tapestry needle for sewing
Supplies to give structure to sword and shield if desired ie. cardboard and straightened paper clip
Legs (make 2)
Rnd 1: With dark brown, make a magic ring and sc 8 (8)
Rnd 2: in BLO, sc 3, 3 dc bobble st 2, sc 3 (8)
Rnd 3 – 4: sc in each st (8)
Rnd 5: Change to medium brown, sc around, attach to first st of round with sl st and FO (8)
Change to yellow (note that my doll has yellow leggings on, but skin tone would actually be more accurate here)
Rnd 6: in BLO, sc 3, inv dec, sc 4 (7)
Rnds 7 -9: sc in each st (7)
sl st in next st and FO
Lightly stuff the legs.
Body and Head
Rnd 1: With yellow (or skin tone for accuracy or green to hide the goods), join the legs and sc 5, sc tog, sc 5, sc tog (12)
Rnd 2: [sc 5, inc] 2 times (14)
Rnd 3: Change to green, sc around (14)
Change to dark brown
Rnd 4: in BLO, sc around (14)
Change to green
Rnd 5 – 6: sc around (14)
Rnd 7: invdec, sc 5, change to medium brown, sc 2, change to green, invdec, sc 5 (12)
Stuff the body
Rnd 8: invdec 3, change to brown, sc 2, change to green, invdec 2 (6)
Change to skin color
Rnd 9: sc around (6)
Rnd10: inc 6 (12)
Rnd 11: [sc, inc] 2 times, [sc, hdc] in next st, dc, [hdc, sc] in next st, [sc, inc] 2 times (18)
Rnd 12: sc 4, [ch 5, working in back loop of ch, sl st in second chain from hook, sc 2, hdc, dc, next sc in Rnd] ear made, sc 10, ear, sc 4 (18)s
Rnd 13: sc 4, invdec over ear, catching the rear most and front most st, sc 4, [ch 3, sl st, sc 2 in back loops of ch and sc] nose made, sc 4, invdec over ear catching the front and rear st of ear, sc 3 (16 st not including nose)
[If you have issues figuring out the ears there are many pictures of how to execute these properly in the pattern for Zelda – The Legend of Zelda: Ocarina of Time detailed photos post.]
Rnd 14: sc 4, insert your hook into the loop from side/back of ear to make it stand up, then put your hook into the next sc in round, draw up a loop, pull this loop through the first two loops on the hook, YO, and pull through both loops on hook to complete the sc, sc 5, skip nose and sc on the other side of it, sc 4, insert your hook into the loop from side/back of ear to make it stand up, then put your hook into the next sc in round, draw up a loop, pull this loop through the first two loops on the hook, YO, and pull through both loops on hook to complete the sc, sc 3 (17)
Rnd 14: sc around (17)
Rnd 15: [invdec, sc] 5 times, sc (12)
Rnd 16: [invdec, sc] 4 times (8)
Attach safety eyes between rounds 14 and 15.
Stuff the head
Rnd 16: invdec to close the hole (4)
FO


Bottom of shirt
Turn the doll upside down.
Join green yarn to one of the free loops at the bottom of the belt.
Rnd 1: sc 4, inc, sc 6, inc, sc 4 (15)
Rnd 2: sc around (15)
Rnd 3: [inc, sc 4] 3 times (18)
FO, weave in ends
Arms (make 2)
Rnd 1: with skin color, make a magic ring and sc 6 (6)
Rnd 2 – 3: sc around (6)
Change to medium brown
Rnd 4 – 8: sc around (6)
Sl st and FO, leaving a long yarn end for sewing.
Sew arms to body: note that the right arm should be parallel to the floor to hold his shield where the left is his sword arm so it can be more at his side.
Hat (short – see previous post for picture)
With green, make a magic ring and sc 3
Rnd 1: sc 3 (3)
Rnd 2: inc around (6)
Rnd 3: sc around (6)
Rnd 4: [sc 2, inc] 2 times (8)
Rnd 5: sc around (8)
Rnd 6: [sc 2, inc] 2 times, sc, inc (11)
Rnd 7: inc, sc 10 (12)
Rnd 8: sl st 2, sc 2, hdc 2, dc, hdc 2, sc 2, sl st (12)
Rnd 9: invdec, [sc, inc] two times, hdc, 2 hdc in next st, hdc, [inc, sc] 2 times, invdec (15)
Rnd 10: [sc 2, inc] 3 times, sc 3, connect to first st of round with a sl st and FO (18)
Rnd 11: with yellow, [sc 3, inc] 5 times, leaving off the last inc (22)
Rnd 12: sc around (22)
FO, leaving a long end for sewing.
Hat (long – shown here)
With green, make a magic ring and sc 3
Rnd 1: sc around (3)
Rnd 2: inc, sc around (4)
Rnd 3: inc, sc 2, inc (6)
Rnd 4: [sc 2, inc] 2 times (8)
Rnd 5: [sc 3, inc] 2 times (10)
Rnd 6: sc around (10)
Rnd 7: [sc 4, inc] 2 times (12)
Rnd 8: sc around (12)
Rnd 9: [sc 5, inc] 2 times (14)
Rnd 10: sc around (14)
Rnd 11: [inc, sc] 2 times, [hdc 2 tog, hdc] 2 times, hdc 2, [inc, sc] 2 times (16)
Rnd 12: [inc, sc] 2 times, sc 2, [hdc, hdc 2 tog] 2 times, hdc, sc, [inc, sc] 2 times (18)
Rnd 13: sc 4, inc, 2 hdc in next st, dc, 2 dc tog, 2 dc in next st, 2 dc tog, dc, 2 hdc in next st, inc, sc 4 (22)
Rnd 14: sc 4, inc, hdc, 2 hdc in next st, dc, 2 dc tog, 2 dc in next st, 2 dc tog, dc, 2 hdc in next st, hdc, inc, sc 4 (26)
Rnd 15: change to yellow, sc 9, [hdc, 2 hdc tog] 2 times, hdc, sc 9 (23)
Rnd 16: sc around (23)
FO, leaving a long end for sewing
Sword
With gold yarn and 2.5 mm crochet hook, make a magic ring and sc 4
Rnd 1 – 5: sc around (4)
Rnd 6: *[ch 3, starting in second ch from hook, sc 2] cross guard side made. Sc 2 into Rnd 5 to secure cross guard to hilt* then repeat from * to * and then sl st to complete hilt. (14 including ch and cross guard sc)
Change to silver
Rnd 7: sc 4 in round, ignoring cross guard st (4)
Rnd 8 – 17: sc around (4)
Rnd 18: inv dec 2, FO and weave in the end (2)
May insert a toothpick or bit of wire or piece of a paper clip to give it stiffness, but the sword blade should stand up on its own without support.
Stitch sword to left hand of doll or you can make a handle for the sword the same way you made one for the shield.
Shield back
With medium brown yarn and 2.5 mm crochet hook, ch 9
Row 1: sc in second chain from hook, sc in each ch across, turn (8)
Row 2 – 8: ch 1, sc across, turn (8)
Row 9: sl st, sc 6, turn (7)
Row 10: sl st, sc 4, turn (5)
Row 11: sl st, sc 2 (3)
Row 12: sc, FO (1)
Shield front
With medium yarn and 2.5 mm crochet hook, ch 9
Row 1: sc in second chain from hook, sc in each ch across, turn (8)
Row 2 – 3: ch 1, sc 3, change to red, sc 2, change to brown, sc 3, turn (8)
Row 4 – 5: ch 1, sc, change to red, sc 6, change to brown, sc, turn (8)
Row 6 – 8: ch 1, sc 3, change to red, sc 2, change to brown, sc 3, turn (8)
Row 9: sl st, sc 2, change to red, sc 2, change to brown, sc 2, turn (7)
Row 10: sl st, sc 4, turn (5)
Row 11: sl st, sc 2 (3)
Row 12: sc, FO (1)
Constructing Shield
Layer the two shield shapes together. Using medium brown yarn and starting at the top corner, sc the two shield shapes together. At each corner, sc on the current side of the corner, ch 1, and then sc on the other side of the angle. Stop at the other top corner.
Insert a piece of cardboard or anything flat and stiff that will help the shield hold it’s shape in between the two layers of shield. Ch 1 for the corner and then sc across the top. Ch 1 and then attach to beginning of round with a sl st. FO and weave in the end.
Shield strap
ch 10 in the color of your choice, sc 9, FO.
Stitch this to the middle back of the shield in a vertical line in the top third of the shield. Make sure the arm of your doll can fit through the strap before sewing down the second end.
Hair
Wrap medium brown (or one shade lighter if you prefer) yarn around a 2” piece of cardboard 14-18 times. Stitch up the middle to make a wig. Position the wig on the doll’s head with the stitch seam going from ear to ear. Arrange the hair so there is about three strands in front of each ear and then gather the remainder of the front hair into a pointy cluster over the right eye. Arrange the back half of the hair evenly behind the ears. You can stitch or glue the wig on, but I just stitched on the hat over the wig to hold the wig in place. Trim hair to page boy length for back and forelocks and to stick out as much as you like in the front, shaping the front bunch to a bit of a point.


